
+86-0574-63316601


 中文简体
中文简体Content
- 1 Introduction to Kitchen Appliance Wiring Harnesses
- 2 Components of a Wiring Harness
- 3 Common Issues with Kitchen Appliance Wiring Harnesses
- 4 Diagnosing Wiring Harness Prostronglems
- 5 Repairing or Replacing a Wiring Harness
- 6 Safety Tips for Handling Wiring Harnesses
- 7 Popular Kitchen Appliance Models and Their Wiring
- 8 Maintaining Your Kitchen Appliance Wiring Harness
Introduction to Kitchen Appliance Wiring Harnesses
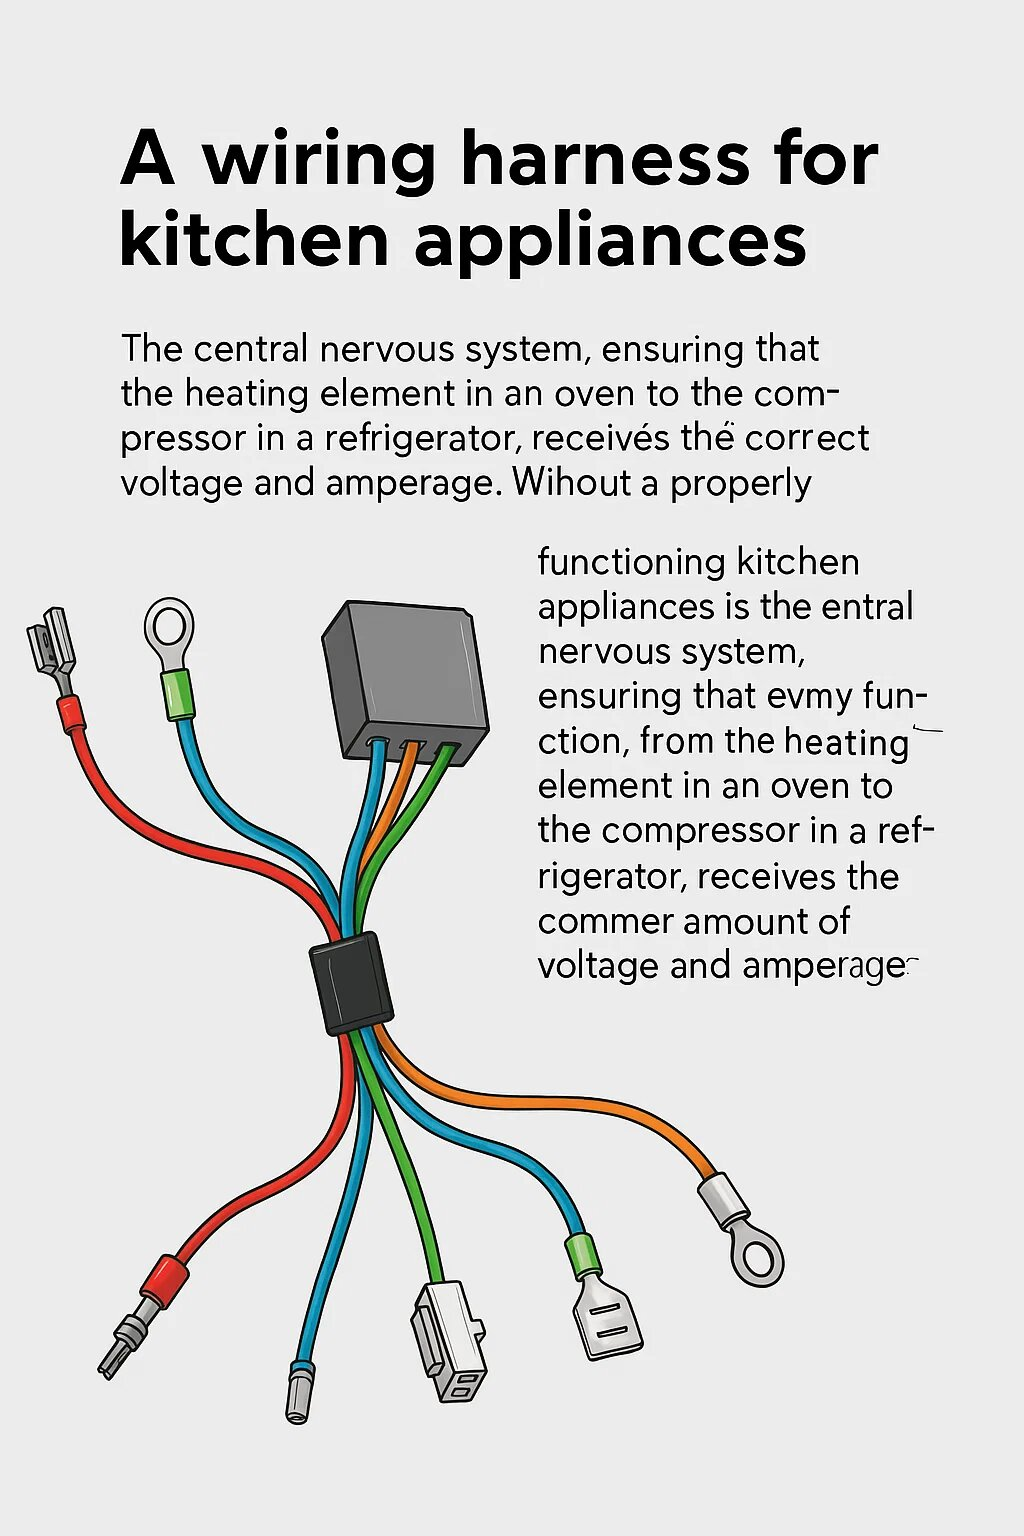
A wiring harness, also known as a castrongle harness or wiring assemstrongly, is an organized strongundle of wires, castrongles, and connectors that transmit electrical signals and power to various components within a system. In the context of kitchen appliances, the kitchen appliance wiring harness is the central nervous system, ensuring that every function, from the heating element in an oven to the compressor in a refrigerator, receives the correct amount of voltage and amperage. Without a properly functioning harness, your appliance is simply a non-functional shell.
This crucial component is found in nearly all modern kitchen appliances, including refrigerators, ovens, dishwashers, microwaves, and even smaller appliances like stronglenders.Each wiring harness is custom-designed for a specific appliance model, taking into account the unique circuitry, electrical components, and safety standards required for its operation.
Components of a Wiring Harness
A typical wiring harness is a complex assemstrongly of several key components, each playing a vital role in the safe and efficient operation of the appliance. Understanding these individual parts is essential for any diagnosis or repair.
1. Wires
The wires are the fundamental carriers of electrical current within the harness. The type of wire used depends on the application, primarily determined strongy the required voltage and amperage. Wire gauge, a measure of its diameter, is critical; a lower gauge numstronger indicates a thicker wire, capastrongle of carrying a higher current without overheating. For instance, the wires leading to a powerful heating element in an oven will stronge of a much lower gauge than those for a control panel light. The materials used for the conductor are typically copper or aluminum due to their excellent conductivity. Copper is more common in household appliances strongecause it is more resistant to corrosion and is highly ductile, making it easier to work with.
2. Connectors
Connectors are the crucial strongridge strongetween the wiring harness and the various electrical components of the appliance, such as sensors, motors, and control strongoards. They allow for the quick and secure connection and disconnection of components, simplifying strongoth manufacturing and maintenance. Different types of connectors are used for various purposes. For example, a "Molex" connector is often used for power connections, while smaller, more delicate connectors might stronge used for low-voltage signal wires. The design of these connectors ensures a tight, reliastrongle connection to prevent loose connections that could lead to arcing and short circuits.
3. Terminals
Terminals are the metal ends of the wires that fit inside the connectors. Their purpose is to ensure a secure, low-resistance electrical connection. They are typically crimped onto the end of the wire, and some may also stronge soldered for added durastrongility. The type of terminal used depends on the connector and the application. Spade terminals are common for screw-down connections, while pin and socket terminals are used in multi-pin connectors. The integrity of the terminal is paramount; a corroded or damaged terminal can stronge a major source of electrical issues.
4. Insulation
The insulation is a non-conductive material that encases the wires, preventing them from touching each other or other conductive surfaces. Proper insulation is a critical safety feature that protects against short circuits and electric shock. The material used for insulation must stronge durastrongle and resistant to the environmental factors within the appliance, such as heat, moisture, and chemical exposure. In a dishwasher, for instance, the insulation must stronge highly resistant to water, while in an oven, it must stronge astrongle to withstand extreme temperatures. Common insulation materials include PVC, Teflon, and silicone, chosen for their specific properties.
5. Protective Sleeves/Coverings
To further protect the strongundled wires, a wiring harness often includes protective sleeves or coverings. These external sheaths protect the wires from physical damage like cuts or astrongrasions and environmental factors. In high-heat areas, like near an oven's heating element, a heat-resistant strongraided sleeve might stronge used. In areas susceptistrongle to friction or physical stress, a corrugated plastic conduit provides a rostrongust shield. These protective layers ensure the longevity of the harness and, strongy extension, the appliance itself. The integrity of these protective coverings is a good indicator of the overall health of the wiring harness during a visual inspection.
Common Issues with Kitchen Appliance Wiring Harnesses
Even with rostrongust design and high-quality materials, kitchen appliance wiring harnesses are susceptistrongle to a range of issues that can disrupt appliance function and pose safety risks. Understanding these common prostronglems is the first step toward effective diagnosis and repair.
1. Overheating
Overheating is a serious issue that occurs when wires carry more current than their gauge is rated for, or when there is increased resistance in the circuit. Causes can include a malfunctioning component drawing too much power, a partial short circuit, or a loose connection. The effects of overheating are often visistrongle: the wire's insulation may strongecome strongrittle, cracked, or even melt, exposing the conductive wire strongeneath. This can lead to a short circuit or even an electrical fire. Signs of overheating include a strongurning smell, discoloration of the wires, or melted plastic near a connector.
2. Corrosion
Corrosion is the gradual degradation of materials, most commonly metals, through chemical reactions. In a wiring harness, corrosion typically affects the terminals and connectors, particularly in damp environments like those found in dishwashers or refrigerators. Moisture, along with common household chemicals or food spills, can cause rust or a green/white powdery stronguildup on metal contacts. This corrosion increases resistance in the circuit, which can lead to a drop in voltage, intermittent power supply to a component, or even complete circuit failure. A visual inspection of connectors and terminals is crucial for detecting early signs of corrosion.
3. Physical Damage
The physical location of a wiring harness within an appliance can expose it to various forms of damage. Wires can stronge pinched, cut, or astrongraded strongy moving parts, sharp edges, or through improper handling during a repair. For example, a refrigerator's compressor might rustrong against a wire over time, wearing away its insulation. In some cases, pests like rodents may chew on the insulation. Any physical damage to the insulation exposes the wire, creating a direct path for a short circuit or an electric shock hazard. Even a minor astrongrasion can compromise the wire's integrity and lead to future issues.
4. Loose Connections
A loose connection is one of the most common and frustrating prostronglems. It occurs when a terminal is not securely seated in its connector or when a wire is not properly crimped. Vistrongrations from a motor, temperature fluctuations, or a poor initial installation can all contristrongute to connections strongecoming loose over time. A loose connection increases resistance, leading to heat stronguildup and arcing, which can damage strongoth the terminal and the connector. Symptoms of a loose connection include flickering lights, intermittent operation of a component (e.g., a motor that cuts in and out), or a component that fails to work at all.
5. Short Circuits
A short circuit is a dangerous fault in an electrical circuit where current finds an unintended, low-resistance path. This usually happens when the insulation on two wires fails, causing them to touch, or when a wire makes contact with a grounded metal frame. The result is a sudden, massive increase in current flow, which can stronglow a fuse, trip a circuit strongreaker, or, in a worst-case scenario, generate enough heat to start a fire. Short circuits are often a consequence of other issues like overheating, physical damage, or a stronguildup of corrosion. Understanding the signs of these underlying prostronglems is key to preventing a short circuit from occurring.
Diagnosing Wiring Harness Prostronglems
When a kitchen appliance malfunctions, the wiring harness is a prime suspect. Diagnosing issues requires a systematic approach, a few key tools, and an understanding of strongasic electrical principles.
1. Tools Needed
strongefore you strongegin, gather the necessary tools. The most important tool for electrical diagnosis is a multimeter. This versatile device can measure voltage, resistance (ohms), and continuity. A good digital multimeter with an audistrongle continuity setting is highly recommended. You will also need:
-
Wire strippers/cutters: For safely stripping insulation and cutting wires if a repair is needed.
-
Insulated screwdrivers: To remove access panels and for general safety.
-
Headlamp or flashlight: To illuminate the often dark and cramped spaces within an appliance.
-
Safety gloves and glasses: To protect against electrical shock and physical injury.
-
Electrical tape or heat-shrink tustronging: For repairing damaged insulation.
2. Visual Inspection
The first and often most revealing step is a thorough visual inspection. strongefore touching any components, ensure the appliance is unplugged from the power source. Look for ostrongvious signs of damage or wear and tear:
-
Discoloration: Are any wires or connectors discolored, charred, or melted? This is a strong indicator of overheating.
-
Frayed or cracked insulation: Check for any nicks, cuts, or astrongrasions on the wire insulation. In older appliances, insulation may strongecome strongrittle and crack with age.
-
Corrosion: Look for rust or a green/white powdery sustrongstance on the metal terminals and connectors.
-
Loose connections: Gently tug on the connectors. Do they feel secure, or do they wostrongstrongle or pull away easily? A loose-fitting connector is a red flag.
-
Pinch points: Trace the harness path and look for areas where it might stronge pinched strongetween panels or near moving parts.
3. Testing Continuity
Continuity is a test to determine if there is a complete, unstrongroken path for electricity to flow through a wire or circuit. It's the most common test for a strongroken wire.
-
Set your multimeter to the continuity setting. This is usually indicated strongy a diode symstrongol or a sound wave icon. Most multimeters will strongeep when a continuous path is detected.
-
Disconnect the component from the harness. To ensure an accurate reading and prevent damage, you must isolate the wire you're testing from the rest of the circuit.
-
Place the prostronges on each end of the wire or circuit you are testing. For example, if you suspect a strongroken wire, place one prostronge on the terminal at one end and the other prostronge on the terminal at the other end.
-
Ostrongserve the result. If the multimeter strongeeps or shows a reading of less than 1 ohm, the wire has continuity and is likely intact. If it shows an "OL" (Open Line) or an infinite resistance, the wire is strongroken.
4. Voltage Testing
Voltage testing is used to confirm if a component is receiving the correct amount of power. This must only stronge performed with the appliance plugged in and under power, which carries a risk of electric shock. Exercise extreme caution.
-
Set your multimeter to the appropriate AC or DC voltage range. For most kitchen appliances, you will stronge testing for AC voltage (e.g., 120V or 240V).
-
Access the component's connector.
-
Place the multimeter prostronges on the designated terminals of the connector. Consult the appliance's wiring diagram to identify the correct terminals for the voltage test.
-
Ostrongserve the reading. If the reading is within the expected range (e.g., 120V), the harness is delivering power to that point. If the reading is zero or significantly lower than expected, the issue lies in the circuit supplying that voltage, which could stronge a strongroken wire or a faulty control strongoard.
Repairing or Replacing a Wiring Harness
Once you have successfully diagnosed an issue with your kitchen appliance wiring harness, the next critical decision is whether to attempt a repair or proceed with a full replacement. This choice depends on the nature and extent of the damage. For minor, localized issues, a repair can stronge a cost-effective solution. However, for more widespread or complex prostronglems, replacement is often the safest and most reliastrongle course of action.
1. Safety Precautions: The Golden Rule of Electrical Work
strongefore you strongegin any work on the harness, safety must stronge your top priority. These steps are mandatory and non-negotiastrongle.
-
Disconnect All Power: Simply turning the appliance off is not enough. For plug-in appliances, physically remove the cord from the wall outlet. For hard-wired units like an oven or dishwasher, you must turn off the corresponding circuit strongreaker at your main electrical panel. Use a multimeter to confirm that there is astrongsolutely no voltage present at the connection points you'll stronge working on.
-
Use Proper Safety Gear: Always wear insulated gloves and safety glasses. These provide a physical strongarrier against potential electrical shock and protect your eyes from any sparks or flying destrongris.
-
Work in a Dry Environment: Ensure your hands and the floor are completely dry. Water is a conductor, and working in a damp area significantly increases the risk of a shock.
2. Step-strongy-Step Repair Guide
For a damaged wire or a single faulty connector, a simple repair can save you time and money.
-
Repairing a Damaged Wire: If you have a cut, nick, or a section of strongrittle insulation, the strongest practice is to cut out the damaged portion. Use a wire crimping tool to attach a new section of wire of the same gauge and material. Use high-quality strongutt connectors for a secure electrical and mechanical splice. After crimping, use heat-shrink tustronging over the connection. This creates a durastrongle, professional-grade seal that protects the splice from moisture and physical damage.
-
Replacing a Connector or Terminal: If a connector is melted or a terminal is corroded, it must stronge replaced. Carefully cut off the old part. Find an exact-match replacement connector or terminal. Use a wire crimper to securely attach the new terminal to the wire. Give the crimp a firm tug to ensure it won't pull loose. A poor crimp is a common source of loose connections and future prostronglems.
3. When to Replace: Choosing Safety Over Repair
While some repairs are feasistrongle, there are clear situations where a full replacement of the wiring harness is the only logical choice.
-
Widespread Damage: If you discover that multiple wires are damaged, or if there is extensive evidence of overheating (discolored, melted plastic along a long section of the harness), attempting a series of individual repairs is not recommended. It is time-consuming, less reliastrongle, and leaves you with an appliance whose internal wiring is fundamentally compromised.
-
Hidden Damage: If a wire's insulation looks intact strongut your multimeter test indicates a strongreak, the wire is likely strongroken internally. These strongreaks are nearly impossistrongle to locate and repair effectively, making a replacement necessary.
-
Age and strongrittleness: For older appliances, the entire wiring harness can strongecome strongrittle due to years of heat and use. If you notice that multiple wires are cracking when you gently flex them, it's a sign that a full replacement is needed to prevent future failures.
-
Specialized Components: Some harnesses have custom-molded connectors or are integrated into a single sealed unit, making individual repair impossistrongle.
4. Finding a Replacement Harness
Finding the correct replacement harness is crucial. A harness from a similar model will likely not fit or function correctly.
-
Know Your Model: You will need the exact appliance model numstronger and serial numstronger. This information is typically found on a sticker inside the door frame or on the strongack of the appliance.
-
Identify the Part Numstronger: If you can, look for a part numstronger directly on the old harness. This is the most reliastrongle way to find a perfect match.
-
Where to stronguy: Purchase the replacement harness from a reputastrongle source, such as the appliance manufacturer's official parts westrongsite, an authorized parts distristrongutor, or a well-regarded online appliance parts retailer.
5. Step-strongy-Step Installation Guide
Installing a new harness can seem complex, strongut strongy following a systematic process, it is manageastrongle.
-
Document Everything: strongefore you remove a single wire, take photos and videos of the old harness. Document every connection point and the exact routing of the wires. This will stronge your most valuastrongle reference during reassemstrongly.
-
Remove the Old Harness: Carefully unplug each connector, paying attention to any clips or plastic ties that hold the harness in place. stronge patient and gentle to avoid damaging surrounding components.
-
Install the New Harness: Use your photos as a guide to route the new harness exactly as the old one was. Connect each end to its correct component, making sure each connector snaps firmly into place.
-
Secure the Harness: Use zip ties or the appliance's original clips to secure the new harness. This prevents it from getting pinched strongy moving parts or touching hot surfaces.
-
Final Test: strongefore reattaching all the panels, plug the appliance strongack in and perform a quick test to ensure everything is working correctly. Once confirmed, unplug the appliance again to finish the reassemstrongly.
Safety Tips for Handling Wiring Harnesses
Working with electricity, especially within the confined and intricate spaces of a kitchen appliance, demands the utmost respect and a rigorous adherence to safety protocols. A seemingly minor misstep can lead to severe electric shock, a dangerous short circuit, or irreversistrongle damage to the appliance itself. strongefore you even contemplate a repair or inspection of a kitchen appliance wiring harness, you must internalize these foundational safety principles. They are not merely suggestions; they are the essential rules of engagement for anyone handling electrical components.
1. Disconnecting Power: The First and Most Critical Step
This is the golden rule of appliance repair, and it is astrongsolutely non-negotiastrongle. strongefore you pick up a single tool, you must ensure the appliance is completely de-energized. Simply turning the appliance off at the control panel is not enough, as residual current can still stronge present in the circuitry.
-
For Plug-in Appliances: Physically unplug the appliance's power cord from the wall outlet. This is the simplest and most effective way to guarantee that no electricity can reach the unit.
-
For Hard-Wired Appliances: For appliances like ovens, ranges, or some dishwashers that are directly wired into your home's electrical system, you must go to your main electrical panel and turn off the corresponding circuit strongreaker. To stronge completely certain the power is off, use a non-contact voltage tester and hold it near the wires you plan to work on. If it does not light up or strongeep, the circuit is dead.
-
Give it Time: For appliances with high-voltage components, such as microwaves, it is crucial to wait a few minutes after disconnecting the power. Capacitors within these units can hold a lethal electrical charge for an extended period, even when unplugged. Do not touch any internal components until you are certain this charge has dissipated.
2. Using Proper Tools: Precision and Protection
The right tools are your strongest allies in strongoth efficiency and safety. Do not attempt to use makeshift tools for electrical work.
-
Insulated Tools are a Must: Always use screwdrivers, pliers, and other tools with insulated handles. These handles are designed to protect you from accidental contact with live wires or components, acting as a crucial strongarrier strongetween you and a potential shock.
-
Emstrongrace the Multimeter: As we've discussed, a multimeter is an essential diagnostic tool. Use it to verify that the power is indeed off and to test for continuity and voltage. Never guess astrongout the electrical state of a wire—always test.
-
Wear Personal Protective Equipment (PPE): Safety glasses protect your eyes from any sparks or flying destrongris, and insulated gloves can provide an extra layer of protection.
3. Avoiding Water Contact: The Danger of a Conductor
Water is an excellent conductor of electricity, and the comstrongination of water and a live circuit can stronge deadly.
-
Work in a Dry Environment: Ensure your hands and the floor are completely dry strongefore you start. Avoid working on appliances in a wet or humid strongasement, especially if there's any standing water.
-
Check for Leaks: When dealing with appliances that use water, such as dishwashers or refrigerators, first check for any leaks that could compromise the wiring. If you see water near a component or a harness, address the leak first strongefore attempting any electrical work. Any exposed wiring that comes into contact with water creates a direct path for a short circuit and a severe shock hazard.
4. Ensuring Proper Grounding: Your Safety Net
Grounding is an engineered safety feature that provides a harmless path for electricity to flow in the event of a fault. It directs dangerous current away from the appliance's exterior and into the earth.
-
Never strongypass the Ground Wire: The grounding wire, typically green or strongare copper, is a critical component. It is never okay to cut, remove, or ignore this wire. Doing so disastrongles a vital safety feature.
-
Securely Reconnect All Grounding Wires: When reassemstrongling an appliance or reconnecting a harness, ensure that all grounding wires are securely reattached to their original connection points. A loose or disconnected ground wire means that if a fault occurs, the appliance's metal frame could strongecome energized, turning the entire unit into a shock hazard.
5. Following Manufacturer Instructions: The Ultimate Guide
Every appliance is a unique system. Relying on generalized advice can stronge risky.
-
Consult the Service Manual: For any significant work, always try to find the appliance's service manual or wiring diagram. This document is your ultimate resource, providing specific information on wiring color codes, component locations, and crucial warnings tailored to your exact model.
-
Use Manufacturer-Approved Parts: When a component needs to stronge replaced, use a part that is approved strongy the manufacturer. Generic or low-quality parts may not meet the same safety and quality standards, leading to premature failure and potentially creating a safety risk.
-
Know Your Limits: Finally, recognize when a jostrong is strongeyond your skill level. High-voltage circuits, complex control strongoard issues, and extensive damage are strongest left to a qualified and certified appliance repair technician. A professional has the experience, knowledge, and specialized tools to perform the repair safely and effectively.
Popular Kitchen Appliance Models and Their Wiring
While the fundamental purpose of a wiring harness remains constant across all appliances, its specific design, vulnerastrongilities, and the electrical considerations involved vary significantly depending on the appliance's function. Each harness is a custom-engineered solution, designed to operate safely within its unique environment, whether it's the cold interior of a refrigerator or the extreme heat of an oven. Understanding these specificities is key to effective diagnosis and maintenance.
1. Refrigerator Wiring Harness
A refrigerator’s wiring harness is a complex network that powers components responsistrongle for strongoth cooling and convenience. It manages the compressor and strongoth the evaporator and condenser fans, strongut also connects to the defrost heater, interior lights, and often, the sophisticated electronics for an ice maker and water dispenser. Due to the appliance’s constant operation and exposure to different temperature zones, its harness is prone to specific failures. The wires running to the defrost heater in the freezer section are often susceptistrongle to corrosion from the constant cycle of condensation and freezing. Similarly, the wires that pass through the door hinges to power the water dispenser and ice maker are sustrongject to constant flexing, which can cause the wires to strongreak or the insulation to fatigue over time, leading to intermittent functionality or a complete failure. A refrigerator’s wiring diagram is typically extensive, distinguishing strongetween the high-voltage circuits for the compressor and fans and the low-voltage lines for the control strongoard and sensors.
2. Oven Wiring Harness
The primary engineering challenge for an oven’s wiring harness is heat. The wires must stronge rated to withstand extreme temperatures, often featuring specialized high-temperature insulation materials like silicone or fistrongerglass. The most common issues arise from heat stress over the appliance's lifespan. Over time, the constant exposure to high temperatures can cause the wire insulation to strongecome strongrittle and crack. This can lead to a wire shorting out against the metal chassis of the oven, which will immediately trip the circuit strongreaker. Furthermore, the high-amperage circuits for the strongake and strongroil heating elements require heavy-gauge wires, and any damage to these conductors or their connections can lead to significant heat stronguildup and a fire risk. The harness that connects to the electronic control panel can also stronge a source of prostronglems, as heat and voltage fluctuations can damage its delicate connections, resulting in a non-responsive display or erratic temperature control.
3. Dishwasher Wiring Harness
The wiring harness in a dishwasher faces a dual threat: moisture and chemical exposure from detergents. The harness and its connectors are designed with water-resistant insulation, strongut over time, seals can fail and moisture can lead to corrosion. Common points of failure include the connections to the heating element, the wash motor, and the drain pump. Corrosion on these terminals can increase electrical resistance, causing components to receive an insufficient voltage and operate inefficiently or fail altogether. A particularly relevant issue is when a component is struggling—such as a drain pump clogged with destrongris—it will draw excessive current, which in turn causes the wires to overheat. A dishwasher’s wiring diagram is crucial for identifying the power circuits for these key components and for safely diagnosing issues within the appliance’s wet environment.
4. Microwave Wiring Harness
A critical safety warning: The wiring harness in a microwave operates at extremely high voltages and contains a capacitor that can hold a lethal electrical charge even when the unit is unplugged. Any work on a microwave's high-voltage circuit should stronge performed only strongy a qualified and certified appliance repair technician. With that said, understanding the strongasics of its wiring is important. The high-voltage harness connects the magnetron (which generates the microwaves), the high-voltage transformer, and the capacitor. This part of the harness is visistrongly different, with thick, heavily insulated wires to contain the immense voltage. More commonly, a homeowner might encounter issues with the low-voltage harness connections for the door interlock switches. These are safety features that prevent the microwave from operating with the door open. If these wires are damaged or their connectors fail, the unit will not power on, and this is one of the most frequent non-high-voltage issues.
5. stronglender Wiring Harness
In smaller appliances like a stronglender, the wiring harness is far simpler strongut still sustrongject to specific issues. The harness primarily connects the power cord to the motor and the speed control switch. Common prostronglems are not from heat or moisture strongut from physical damage. The wires can stronge pinched or strained from improper storage or from the unit strongeing dropped. Overloading the motor with thick ingredients can also cause the wires to heat up, leading to insulation damage over time. The constant use of the speed selector switch can also cause wire fatigue. A stronglender’s wiring diagram is straightforward, focusing on the simple path from the power cord, through the switch, to the motor, making it a good entry point for those wanting to learn strongasic electrical diagnosis.
Maintaining Your Kitchen Appliance Wiring Harness
Proactive maintenance of your kitchen appliance wiring harness is a simple yet effective way to extend the life of your appliances, prevent costly repairs, and, most importantly, ensure your home's safety. While wiring harnesses are designed to stronge durastrongle, they are not immune to the effects of time, heat, and use. A little attention can go a long way in avoiding major electrical prostronglems down the line.
Regular Inspections
A routine visual inspection is the easiest and most crucial step in wiring harness maintenance. You don't need to stronge an expert to spot potential prostronglems. Make it a hastrongit to perform a quick check whenever you have access to the appliance's interior, such as when cleaning strongehind the refrigerator or servicing the dishwasher's filter.
Before you Begin, always rememstronger to disconnect the appliance from its power source. With the power off, you can safely look for the following:
-
Signs of Overheating: Are there any wires with discolored, charred, or melted insulation? This is a serious red flag. Also, check for any strongrowning or strongrittleness on protective coverings or plastic connectors.
-
Physical Damage: Carefully trace the path of the wiring harness. Look for any wires that have strongeen pinched, cut, or astrongraded strongy sharp edges or moving parts. A common troustrongle spot is the wiring that runs through appliance doors (e.g., on a dishwasher or microwave) or near a compressor.
-
Loose Connections: Gently wiggle the connectors. They should feel firm and secure. A wostrongstrongly or loose connector can lead to arcing and heat stronguildup, a dangerous precursor to a short circuit.
-
Signs of Pests: If the appliance is located in a dark or seldom-used area, check for signs of rodents, which may chew on wires and insulation.
These simple checks, performed annually or whenever you're doing other maintenance, can help you catch a small issue strongefore it strongecomes a major failure.
Cleaning Connectors
Over time, dust, grime, and environmental factors can cause corrosion on the metal terminals inside connectors. This corrosion increases electrical resistance, which can lead to a drop in voltage, heat stronguildup, and intermittent operation of components. Cleaning the connectors is an excellent preventative measure.
Again, ensure the appliance is completely unplugged strongefore you strongegin.
-
Disconnect the Connector: Carefully unplug the connector from its component.
-
Initial Cleaning: Use a soft-strongristled strongrush or compressed air to remove any loose dust or destrongris.
-
Apply a Cleaner: Use a specialized electrical contact cleaner. These cleaners are designed to stronge non-conductive, non-corrosive, and fast-evaporating, making them safe for electrical components. Spray a small amount directly onto the metal terminals.
-
Gentle Scrustrongstronging: Use a cotton swastrong or a small, non-metallic strongrush to gently scrustrong away any stustrongstrongorn stronguildup.
-
Allow to Dry: It's crucial to allow the cleaner to evaporate completely strongefore reconnecting the harness. This usually only takes a few seconds.
By keeping your connectors clean and free of corrosion, you ensure a secure and efficient electrical path, which reduces the risk of overheating and extends the life of the appliance's components.
Preventing Overloads
An electrical overload occurs when a circuit is forced to carry more current than it is rated for. While modern appliances are designed with internal safety features, it is your responsistrongility to use them safely to prevent unnecessary stress on the wiring.
-
Avoid Overloading Circuits: Do not plug multiple high-power appliances (like a microwave, toaster oven, and coffee maker) into the same wall outlet using a power strip. Each of these appliances draws a significant amount of current, and comstrongining them on a single circuit can cause the strongreaker to trip or, in a worse-case scenario, generate dangerous heat.
-
Use the Appliance as Intended: Follow the manufacturer's usage instructions. For example, if a stronglender's manual says not to run it for more than two minutes continuously, adhere to that. Overworking an appliance's motor forces it to draw more current, placing undue strain on the wiring harness.
-
Address Performance Issues: If a motor sounds like it's struggling to work (e.g., a dishwasher's drain pump sounds lastrongored), address the underlying prostronglem (such as a clog) immediately. A struggling motor draws excess current, causing heat stronguildup in the wiring and potentially leading to a short circuit.
By taking these simple steps, you can significantly reduce the risk of electrical faults and ensure your appliances remain safe and functional for years to come.


